Using your own background images
Using graphic image files as backgrounds
|
|
Direct Line Software offers optional background maps that are compatible with DeedMapper. But you can use your own background image if you like. Typically this is a topographic map or other map that you have scanned, or a graphic file of a map that you have downloaded off the Internet. In both cases we refer to these files as “images”, or “graphic images”. We recommend the use of background images when you know the location of the land to within a few miles. Images that cover a large area to high accuracy are necessarily large, consuming disk space and memory, and slowing the interactivity of the program. You can have up to two graphic image files in the folder containing your deed file (mbl file). DeedMapper will automatically load the graphic images when it loads your deed file. The following graphic formats are accepted: • BMP format • JPG format (JPEG) • TIF format (TIFF) • GIF format • PNG format DeedMapper determines the image file's type from its filename. The filename must end in .bmp, .jpg, .gif, .png, or .tif. For example, mymap.bmp would be understood to be a graphic file in BMP format.
|
The program requires two pieces of information in order to present your image at the same scale as your parcels.
• Graphic density, in dots per inch or pixels per inch
• Scale, in feet per inch
Working with USGS topographic map images
Go to the USGS’s TopoView web site and locate the digital map you want to use.
1. Download the map in TIF format and save it in the folder containing your deed file.
2. Start DeedMapper. Open your deed file. The graphic image will be automatically loaded, but won't be displayed until the next step is performed.
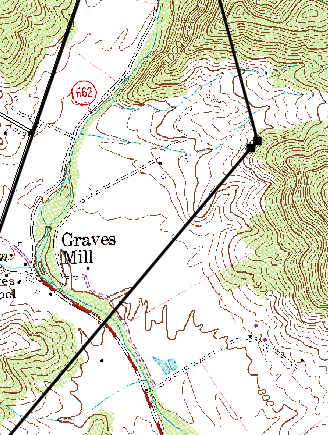
3. Open the View menu and select Options. Select the Images tab and fill it in per the Images Tab instructions. For a 1:24000 scale map image use the values of 2000 ft./inch and 300 dots per inch. The image will be displayed. You can verify the settings by entering a dummy deed that contains one line that runs east for 320 poles (1 mile). Drag the line to the map scale and verify that it fits correctly.
The following additional steps are required for you to export your deeds in KML format to Google Earth, to use GPS points, or to use the grid tool to report latitude and longitude values of any point on the image.
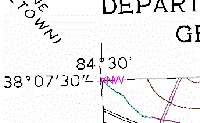
1. Identify the actual corners of the map as follows. Topographic map images have large white borders called “collars” around the actual map portion. Zoom into each corner of the image border and locate its corner marker, e.g. ¤NW, ¤NE, ¤SE, ¤SW. (These markers are small and can be difficult to find. To facilitate their location, temporarily change the Plot View background color to light gray by using View>>Options>>Plot View. Zoom out and you’ll see that the map collar now stands out.) Click on a marker to select it. Right click and select Locked to unlock it and then drag the marker to its proper location in the corner of the map portion of the image file, as illustrated in pink here:
You may wish to right click on the marker and select Locked so it can’t be moved accidentally.
In this example we see the Northwest map corner is at N38/7/30 W84/30. Enter those values in the Images tab for the appropriate corner.
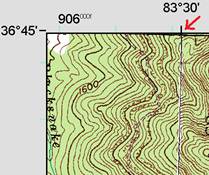
Custom topo map images are also available from a variety of vendors. The corners of those images may not be labeled like the example above, so place the marker at the nearest labeled location as shown here by the red arrow (N36/45 W83/30).
2. In the Images tab of the View Options enter the latitude and longitude of each of the four corner markers.
Working with a scanner
1. Note the scale (feet per inch) of the paper map you are scanning. Set the scanner to at least 300 dpi (dots per inch) resolution, preferably 600 dpi or even higher. This allows the image to be zoomed into without becoming blurry. Save the scanned image in one of the supported formats, and use a file name that ends in bmp, jpg, tif, or gif, as appropriate.
2. Copy the graphic file to the folder containing your deed file.
3. Start DeedMapper. Open your deed file. The graphic image will be automatically loaded, but won't be displayed until the next step is performed.
4. Open the View menu and select Options. Select the Images tab and fill it in per the Images Tab instructions
Working with other downloaded images
Non-topographic background images can also be used. It’s necessary to determine the scale factors to enter.
- Download the graphic image and save it in the folder containing your deed file.
- Determine the scale, in feet per inch, of the image you have downloaded. This can sometimes be a challenge, even if the image contains a map scale. Try printing out the image and then measuring its scale with a ruler. A one inch wide map scale on screen may prove to be wider or narrower than one inch on the printed page. If there is no scale you should try to identify two points that are a known distance apart and then measure the number of inches between them with a ruler. A bit of arithmetic will yield the feet per inch figure that is needed by the program. For example, if two points are 2.5 miles apart and they measure to be 3 inches apart on the printout of the graphic, 2.5 miles times 5280 ft/mile gives 13,200 feet. Divide that by 3 inches and you get 4400 feet per inch. This is the figure that DeedMapper needs.
- Determine the density of the graphic image. In many cases this is not known so we recommend you start with a value of 96 dpi if the image was simply copied off your web browser. DRG files from the USGS (see above) commonly use 250 dpi. Some Internet map sites will sell you graphic files at densities of your own choosing. A higher density means you can zoom into the map without it getting grainy.
- Open the View menu and select Options. Select the Images tab and fill it in per the Images Tab instructions
- Use the Plot View to confirm that the parcels are scaled properly to the background image. You can repeat step 4 and modify the scale or dots per inch values that you entered until the proper scale is achieved.