Overview
The Table View

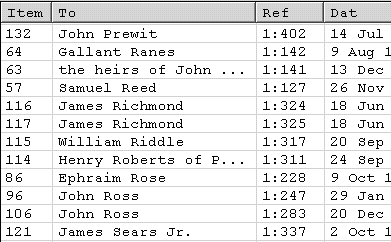
The Table View is where you see a summary listing of all of your deeds. You get to the Table View by pressing the F7 shortcut key or selecting Table View from the View menu.
Each deed in your deed file is summarized in one row of the table. The first column, Item, contains the position of the deed in the deed file. For example, Item 57 is the 57th deed in the deed file. The other columns represent the various kinds of deed abstracting information that you have entered in the Deed Entry form or Text View for each deed. Most deeds, for example, will contain a line beginning with To, followed with the name of the buyer. The Table View shows the name of the buyer in the To column. In similar fashion, other information from the deed text is listed in this view. Thus, the column names correspond to lines of text in the Text View. See Abstracting Information for a description of the possible types of information that can be displayed here.
You can change the columns that are displayed. They are determined by the Table View tab of the View Options dialog box.
Things to Know
When you enter the Table View from one of the other views, the currently selected deed will be highlighted in white on blue.
You can alphabetically sort the deeds in the view by clicking on a column header. This type of sort is temporary, not affecting the deed file. You can also permanently change the order of the deeds in the deed file. See Sorting Deeds.
You can change the order of the columns by dragging the column headers to the left or right with the mouse. Simply press the left mouse button down in the center of a column header, then drag the column sideways, and release.
You can change the widths of the columns by placing the mouse over the thin line separating two column headers. The cursor changes to a left-right arrow to indicate that it is in column width adjustment mode. Hold down the left mouse key and move the mouse until you are happy with the column placement. Release the mouse key.
If the Filter or As Of Date are enabled, the Table View will show only those deeds that meet the filter requirements. If you see no deeds at all it is an indication that the filter is enabled but no deeds pass the Filter. See Filtering Deeds.
You may print the Table View. See Printing Your Work.
Navigating in the Table View
The following keyboard commands are available for navigation:
|
Command |
Function |
|
Up |
Move up one line |
|
Down |
Move down one line |
|
PgUp |
Move to the previous page |
|
PgDn |
Move to the next page |
Selecting/Deselecting a Deed
To select a deed, click on it with the mouse. It will be displayed in white on blue. There is no means to deselect a deed by clicking on it again.
After selecting a deed you can select additional deeds by holding down the CTRL key while clicking on more deeds.
Editing the selected deed
Double clicking a cell in the selected deed allows you to directly edit the field. You can also use the F12 key or the Edit>>Edit Deed command to edit the deed in the Deed Entry form.
Jumping to the selected deed
Use the arrow button in the toolbar to jump to the selected item in the Plot View.