Customizing the Table View
Table View tab (View Options dialog)
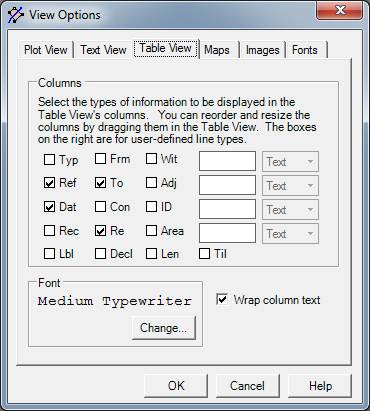
To see this dialog, open the View menu and select Options. Click on the Table View tab. This tab offers you the ability to define the kinds of information shown in the Table View.
Columns – Check the boxes of the columns you want displayed in the Table View. The boxes correspond to line types in the deed text in the Text View. For example, selecting To will cause the Table View to show the information that follows any To lines in your deeds.
The four text entry areas are for you to enter any user-defined tags to be put in the Table View. To the right of the text areas are selectors that allow you to choose how each tag column will be sorted in the Table View: as simple text, as a date, or as a name.
This form determines the information that will be shown in the Table View. You change the presentation order of the columns in the Table View by dragging the column headers to the left or right with the mouse, and the width of the columns is set by dragging the column divider.
Font - Pressing the Change button will cause the Font dialog box to be displayed. Use it to change the font that used in the Table View.
Wrap column text – If checked the Table View will use multiple lines as needed to display all of a column’s text. If unchecked the text will be truncated so that each item is displayed in a single row.