The Deed Entry Form
Deed Entry Form
The Deed Entry form is used to create new deeds when you use the Append Deed or Insert Deed commands in the Edit menu. It is also used to edit existing deeds when you press the Edit Deed button ![]() in the Plot View toolbar or press the F12 key.
in the Plot View toolbar or press the F12 key.
You enter the information from your deed into the fields of the form. It handles the most common situations that occur in deeds, but it does not cover all of them. Some situations require the use of the Text View as your deed editor. See below for a full list. Also see Deed Entry (Metes and Bounds Language) for more information about the details of deed entry.
The form is the most common of the three methods for deed entry. See the View Options dialog for more information.
Abstracting information
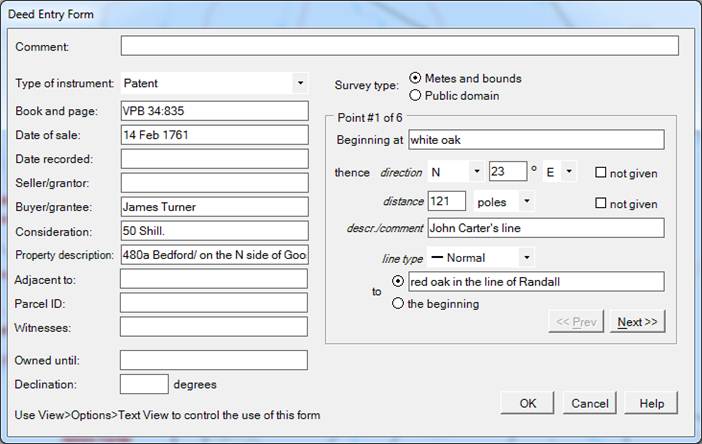
The fields on the left of the form are all optional. The picture above shows how they might be filled in. DeedMapper does not care which, if any, of the fields are filled in and it does not care about the format of those fields. Note that you can select a ‘type of instrument’ from the provided list or you can enter your own.
Survey Type
The Survey Type field allows you to choose between metes and bounds deed entry and public domain entry, as described below. Metes and bounds surveys use compass headings and directions, whereas public domain deeds are described in terms of sections, townships, and ranges.
Metes and bounds survey
If the deed has a metes and bounds survey description you will enter each point of the survey individually, taking the information from the deed itself. In the example above, the survey begins at a white oak tree and then runs North 23 degrees East for 121 poles. The survey line travels along the property line of John Carter (but it could have just as well been “crossing Rabbit Creek”, or other similar information). The line is a normal survey line, not a meander (water) line or unapproved conditional line. The survey line ends at a tree in the line of a Randall. After completing this line the Next button is pressed to allow the entry of the next line of the survey. This continues until all points and lines have been described and “to the beginning” is selected. When deed entry is complete you press the OK button to have the deed data added to the deed file. You should see the new deed in the center of the Plot View.
• A pure direction such as North or Southwest is given
Enter the direction on the form, but leave the degrees and second direction blank. Enter the distance and measurement unit to complete the line.
• No direction and/or distance given
In some cases a survey line has no direction and/or distance. The checkboxes labeled “not given” should be used in this case. A common example is when the survey goes down a creek. You would leave direction and distance values blank, check “not given”, add a line description such as “down the creek”, and then select the Meander line type.
• Chains and Links
Deeds that use chains and links can be handled two ways. 1) There are 100 links per chain so you can enter the links as decimal chains. For example, 5 chains and 13 links is equivalent to 5.13 chains. 2) Enter the number of chains, and then modify the deed in the Text View to add links, i.e. 5C13L. Future changes to the deed must be made in the Text View rather than in the deed entry form.
• Compass points
Deeds that use fractional compass rose points should be entered as much as possible in the form and then modified in the Text View to add the fractional part. For example, in the case of NxW.5pW, you can enter NxW in the form and then add .5pW (half a point west) in the Text View. Future changes to the deed must be made in the Text View rather than in the deed entry form.
• Degrees, Minutes, Seconds
If your survey uses degrees (°), minutes ('), and seconds ("), use forward slashes to separate the parts, e.g. 14/33/24 represents 14 degrees, 33 minutes, and 24 seconds. 14/33 represents 14 degrees and 33 minutes.
Public Domain survey
If the Public Domain survey type is chosen, the righthand part of the form appears as follows. “Aliquot” is the name for the way land in the public domain is described.
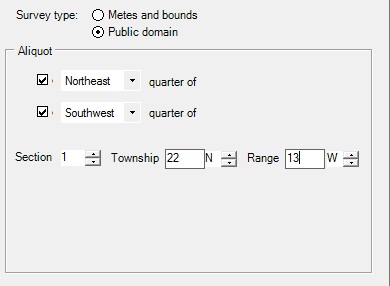
As you enter information in the Aliquot section you’ll see the Re field change to reflect your choices. When you press OK a simple metes and bounds survey is created which reflects the information you entered. The parcels will be square or rectangular according to the information that was entered. The parcel will be platted in the Plot View and you can review the deed in the Text View.
Situations not handled by the form
The following situations require the use of the Text View for editing.
• Distances that contain links
• Directions that use fractional compass rose points, e.g. half a point north
• MBL ‘tags’
o Len
o Lbl
o User-defined tags
• Text View notes